haproxyによるWEB負荷分散
haproxyによるWEBサーバの負荷分散設定を実際に構築。設定ファイルの変更方法からログの出力設定まで丁寧に解説。コンテンツ設置や動作確認の方法も画像付きで分かりやすくまとめました。


目次
概要
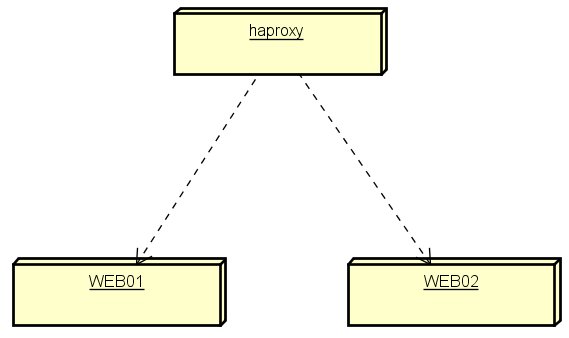
AlmaLinuxにて、haproxyを利用したWEBの負荷分散をしてみたいと思います。
今回、利用する環境は、haproxyサーバ1台、WEBサーバ2台構成とします。
haproxyサーバからWEB2台の private ip に対してチェックをおこないます。
| サーバ名 | private ip |
|---|---|
| WEB01 | 10.0.0.224 |
| WEB02 | 10.0.0.97 |
トラブルを防ぐため、iptablesやfirewalldやnftables等が動作していないことおよび、SELinuxが無効になっていることとします。
WEB01での作業
Apacheのインストール(WEB01)
haproxyでWEB負荷分散するためには、分散先でWEBサービスを Listen していなければいけないのでapacheのインストールをおこないます。
[root@WEB01 ~]# dnf -y install httpd
・
・[中略]
・
Installing:
 httpd                                      x86_64                      2.4.37-47.module_el8.6.0+2935+fb177b09.2                      appstream                      1.4 M
・
・[中略]
・
Complete!
[root@WEB01 ~]# systemctl --now enable httpd
Created symlink /etc/systemd/system/multi-user.target.wants/httpd.service → /usr/lib/systemd/system/httpd.service.→apacheサービスの自動起動を有効にし、サービスを開始します。
コンテンツ設置(WEB01)
haproxyによって分散先がわかるように、以下の様なコンテンツを設置します。
設置後、 http://{WEB01のグローバルIP}/ に対してアクセスをおこない、緑の背景に「WEB01のコンテンツが表示されているよ!」と表示されれば問題ありません。
[root@WEB01 ~]# vim /var/www/html/index.html
<!DOCTYPE html>
<html>
        <head>
                <meta charset="UTF-8">
                <title>WEB01のコンテンツ</title>
        </head> <!-- head -->

        <body style="background-color:green;">
                <h1>WEB01のコンテンツが表示されているよ!</h1><br>
        </body> <!-- body -->
</html> <!-- html -->
WEB02での作業
Apacheのインストール(WEB02)
WEB02でもWEB01同様の作業を実施します。
[root@WEB02 ~]# dnf -y install httpd
・
・[中略]
・
Installing:
 httpd                                      x86_64                      2.4.37-47.module_el8.6.0+2935+fb177b09.2                      appstream                      1.4 M
・
・[中略]
・
Complete!
[root@WEB02 ~]# systemctl --now enable httpd
Created symlink /etc/systemd/system/multi-user.target.wants/httpd.service → /usr/lib/systemd/system/httpd.service.→apacheサービスの自動起動を有効にし、サービスを開始します。
コンテンツ設置(WEB02)
haproxyによって分散先がわかるように、以下の様なコンテンツを設置します。
設置後、 http://{WEB02のグローバルIP}/ に対してアクセスをおこない、ピンクの背景に「WEB02のコンテンツが表示されているよ!」と表示されれば問題ありません。
[root@WEB02 ~]# vim /var/www/html/index.html
<!DOCTYPE html>
<html>
        <head>
                <meta charset="UTF-8">
                <title>WEB02のコンテンツ</title>
        </head> <!-- head -->

        <body style="background-color:pink;">
                <h1>WEB02のコンテンツが表示されているよ!</h1>
        </body> <!-- body -->
</html> <!-- html -->
haproxyサーバでの作業
haproxyインストール
[root@haproxy ~]# dnf install haproxy
Last metadata expiration check: 0:09:46 ago on Sat 25 Jun 2022 05:21:37 PM JST.
Dependencies resolved.
===============================================================================================================================================
 Package                         Architecture                   Version                                Repository                         Size
===============================================================================================================================================
Installing:
 haproxy                         x86_64                         1.8.27-4.el8                           appstream                         1.4 M

Transaction Summary
===============================================================================================================================================
Install  1 Package

Total download size: 1.4 M
Installed size: 4.2 M
Is this ok [y/N]: y
・
・[中略]
・
[root@haproxy ~]# systemctl --now enable haproxy
Created symlink /etc/systemd/system/multi-user.target.wants/haproxy.service → /usr/lib/systemd/system/haproxy.service.→haproxyサービスの自動起動を有効にし、サービスを開始します。
haproxy設定ファイルの編集
[root@haproxy ~]# cp -p /etc/haproxy/haproxy.cfg /etc/haproxy/haproxy.cfg.org
[root@haproxy ~]# cp -p /etc/haproxy/haproxy.cfg /etc/haproxy/haproxy.cfg_$(date +"%Y%m%d")
→あらかじめ、バックアップを取ります。
設定の確認
以下の様にデフォルトで、 log 127.0.0.1 local2 となっており、 syslogの種類が local2 となっていることを確認します。
[root@haproxy ~]# cat /etc/haproxy/haproxy.cfg
#---------------------------------------------------------------------
# Global settings
#---------------------------------------------------------------------
global
・
・[中略]
・
    log         127.0.0.1 local2
・
・[中略]
・
haproxyインストールしたての /etc/haproxy/haproxy.cfg は以下のようになっているので変更します。
・
・[中略]
・
#---------------------------------------------------------------------
# main frontend which proxys to the backends
#---------------------------------------------------------------------
frontend main
    bind *:5000
    acl url_static       path_beg       -i /static /images /javascript /stylesheets
    acl url_static       path_end       -i .jpg .gif .png .css .js

    use_backend static          if url_static
    default_backend             app

#---------------------------------------------------------------------
# static backend for serving up images, stylesheets and such
#---------------------------------------------------------------------
backend static
    balance     roundrobin
    server      static 127.0.0.1:4331 check

#---------------------------------------------------------------------
# round robin balancing between the various backends
#---------------------------------------------------------------------
backend app
    balance     roundrobin
    server  app1 127.0.0.1:5001 check
    server  app2 127.0.0.1:5002 check
    server  app3 127.0.0.1:5003 check
    server  app4 127.0.0.1:5004 check
設定変更
以下のように、80番ポートで Listen し、分散先として、WEB01およびWEB02の private ip を指定するようにします。
[root@haproxy ~]# cat /etc/haproxy/haproxy.cfg
・
・[中略]
・
#---------------------------------------------------------------------
# main frontend which proxys to the backends
#---------------------------------------------------------------------
frontend http_web
    bind *:80
    mode http
    default_backend app

#---------------------------------------------------------------------
# round robin balancing between the various backends
#---------------------------------------------------------------------
backend app
    balance     roundrobin
    mode http
    server WEB01 10.0.0.224:80 check
    server WEB02 10.0.0.97:80 check
diffの結果として、以下のような感じになることを確認します。
[root@haproxy ~]# diff -u /etc/haproxy/haproxy.cfg_$(date +"%Y%m%d") /etc/haproxy/haproxy.cfg
--- /etc/haproxy/haproxy.cfg_20220625   2022-04-19 04:31:18.000000000 +0900
+++ /etc/haproxy/haproxy.cfg    2022-06-25 20:02:21.718000000 +0900
@@ -64,27 +64,16 @@
 #---------------------------------------------------------------------
 # main frontend which proxys to the backends
 #---------------------------------------------------------------------
-frontend main
-    bind *:5000
-    acl url_static       path_beg       -i /static /images /javascript /stylesheets
-    acl url_static       path_end       -i .jpg .gif .png .css .js
-
-    use_backend static          if url_static
-    default_backend             app
-
-#---------------------------------------------------------------------
-# static backend for serving up images, stylesheets and such
-#---------------------------------------------------------------------
-backend static
-    balance     roundrobin
-    server      static 127.0.0.1:4331 check
+frontend http_web
+    bind *:80
+    mode http
+    default_backend app

 #---------------------------------------------------------------------
 # round robin balancing between the various backends
 #---------------------------------------------------------------------
 backend app
     balance     roundrobin
-    server  app1 127.0.0.1:5001 check
-    server  app2 127.0.0.1:5002 check
-    server  app3 127.0.0.1:5003 check
-    server  app4 127.0.0.1:5004 check
+    mode http
+    server WEB01 10.0.0.224:80 check
+    server WEB02 10.0.0.97:80 check
haproxyログ出力設定
haproxyのログを、 rsyslog で受信できるようにするため、 rsyslog 側での設定変更をします。
[root@haproxy ~]# netstat -nlp | grep 514
→UDP 514番ポートで受信するようにしたいため、あらかじめ Listen していないことを確認します。
※なにも出力がなければokです。
[root@haproxy ~]# cp -p /etc/rsyslog.conf /etc/rsyslog.conf_$(date +"%Y%m%d")
[root@haproxy ~]# cp -p /etc/rsyslog.conf /etc/rsyslog.conf.org
→あらかじめ設定ファイルのバックアップをおこないます。
rsyslog 設定ファイルを編集します。
module(load="imudp") # needs to be done just once および input(type="imudp" port="514") がコメントアウトされているのでコメントアウトを外します。
→これで、UDP 514番ポート待ち受けが有効になります。
# ### sample forwarding rule ### の上側あたりに、 local2.* /var/log/haproxy.log の記述を追加します。
→こちらを追加することにより、haproxyのログが、 /var/log/haproxy.log に記録されます。
重複ログ破棄設定
このままでは、 /var/log/messages にも /var/log/haproxy.log と同様の内容が記録されるため、 /var/log/haproxy.log にのみ記録するようにします。
*.info;mail.none;authpriv.none;cron.none /var/log/messages
↓以下へ変更。
*.info;mail.none;authpriv.none;cron.none;local2.none /var/log/messages
という風に local2.none を追加することで、 messages の haproxy 重複ログを抑制することが可能となります。
[root@haproxy ~]# vim /etc/rsyslog.conf
・
・[中略]
・
module(load="imudp") # needs to be done just once
input(type="imudp" port="514")
・
・[中略]
・
# Log anything (except mail) of level info or higher.
# Don't log private authentication messages!
*.info;mail.none;authpriv.none;cron.none;local2.none                /var/log/messages
・
・[中略]
・
# Log all the haproxy messages in one place.
local2.*                                                /var/log/haproxy.log
・
・[中略]
・
rsyslog 設定ファイルの diff 結果は以下の通りとなります。
[root@haproxy ~]# diff -u /etc/rsyslog.conf_$(date +"%Y%m%d") /etc/rsyslog.conf
--- /etc/rsyslog.conf_20220625  2022-05-30 16:47:31.000000000 +0900
+++ /etc/rsyslog.conf   2022-06-25 21:08:50.901000000 +0900
@@ -16,8 +16,8 @@

 # Provides UDP syslog reception
 # for parameters see http://www.rsyslog.com/doc/imudp.html
-#module(load="imudp") # needs to be done just once
-#input(type="imudp" port="514")
+module(load="imudp") # needs to be done just once
+input(type="imudp" port="514")

 # Provides TCP syslog reception
 # for parameters see http://www.rsyslog.com/doc/imtcp.html
@@ -43,7 +43,7 @@

 # Log anything (except mail) of level info or higher.
 # Don't log private authentication messages!
-*.info;mail.none;authpriv.none;cron.none                /var/log/messages
+*.info;mail.none;authpriv.none;cron.none;local2.none                /var/log/messages

 # The authpriv file has restricted access.
 authpriv.*                                              /var/log/secure
@@ -64,6 +64,8 @@
 # Save boot messages also to boot.log
 local7.*                                                /var/log/boot.log

+# Log all the haproxy messages in one place.
+local2.*                                                /var/log/haproxy.log

 # ### sample forwarding rule ###
[root@haproxy ~]# systemctl restart haproxy rsyslog
→最後に haproxy と rsyslog サービスを再起動し、設定を適用します。
事後確認
http://{haproxyのグローバルIP}/ にアクセスし、ページリロード毎に、コンテンツが切り替わる事および、 haproxy.log のみにログが出力されていることを確認できればログ設定と負荷分散が上手くおこなえています。
ページリロード毎に以下、画像のように切り替わります。


まとめ
私自身、haproxyについて、あまり理解できていなかったですが、実際に構築してみて、少しは理解できたかなぁと思いました。
簡単に冗長化できて感無量です!